Antivirus Tales
  • Home
  • Contact Us
  • Knowledge base
  • Support
  • All Antivirus
  • Home
  • Contact Us
  • Knowledge base
  • Support
  • All Antivirus

Step 1

20%

Q1: Kindly choose your brand name.

Step 2

40%

Q2: Kindly choose your device.

Step 3

60%

Q3: Kindly fill your contact details.

Step 4

80%

Q4: Kindly fill your contact details.

Facing trouble with your Antivirus ? - Fix Now
Disable/Turn Off Annoying McAfee Notification And Pop-Up
  • Aug 03, 2024
  •  | 
  • By Mathew Jones
  •  | 
  •  | 
  • Views: 1445

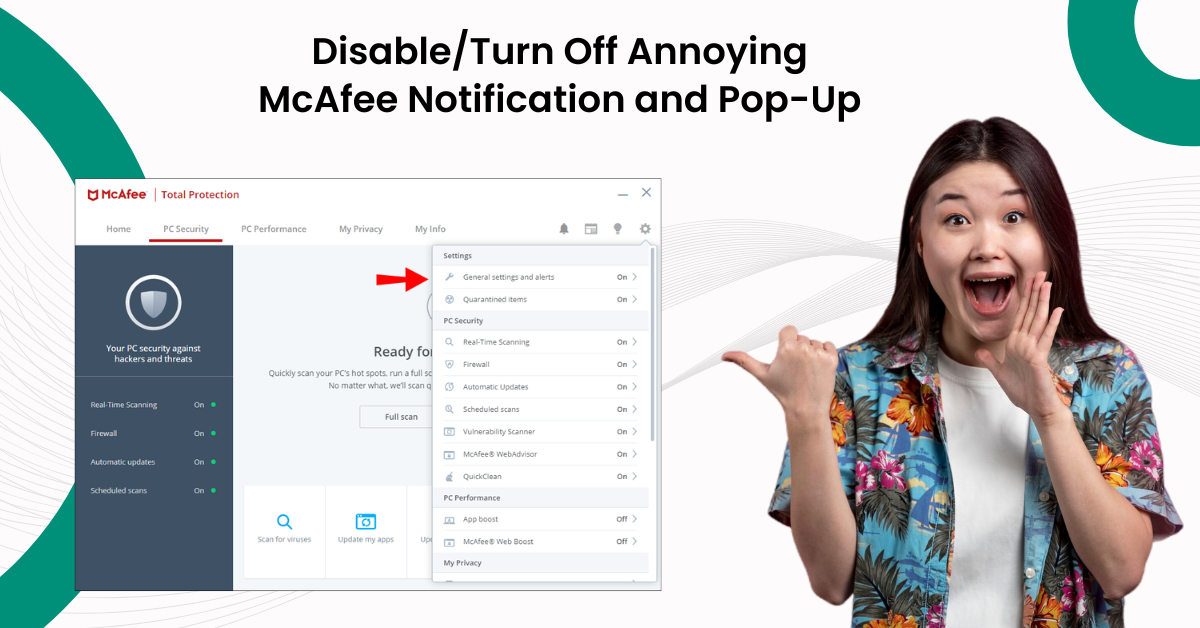
Disable/Turn Off Annoying McAfee Notification and Pop-Up

McAfee offers a broad range of cybersecurity products for both businesses and individuals. However, McAfee's antivirus and internet security suite are usually pre-installed on new PCs. This can lead to frequent pop-ups, particularly if the user is not subscribed to the premium version. Whether McAfee was added as bloatware on a new device or installed by mistake, McAfee notifications may crop up unexpectedly.

It may seem annoying to deal with constant notifications and pop-ups from McAfee. This can be a serious obstruction in your work. So, what can be done to get rid of this problem? This step-by-step guide is all about how you can disable or turn off annoying McAfee notifications and pop-ups. Live chat with experts

Let’s read further to know the solution for disabling or turning off McAfee notifications and pop-ups.

Potential Problems When Disabling Mcafee Pop-Ups

Remember, when disabling McAfee notifications and pop-ups, there also may be some potential issues. A few of them are as follows: 

  • Missed update reminders

  • Troubleshooting challenges

  • Increased risk of malware

  • Configuration errors

Methods to Disable McAfee Notification and Pop-Up

Below, we have mentioned the five best methods to disable McAfee notifications and pop-ups:

Method 1: Run Task Manager

   Step 1: Press Control, Shift, and ESC keys on your keyboard to open Task Manager.
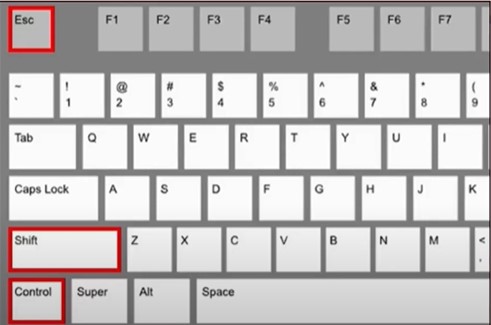
Control, Shift, and ESC keys


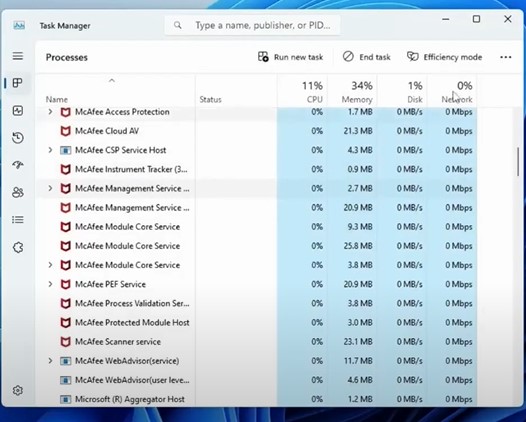
   Step 2: Locate any kind of application and processes related to McAfee that you don’t identify.
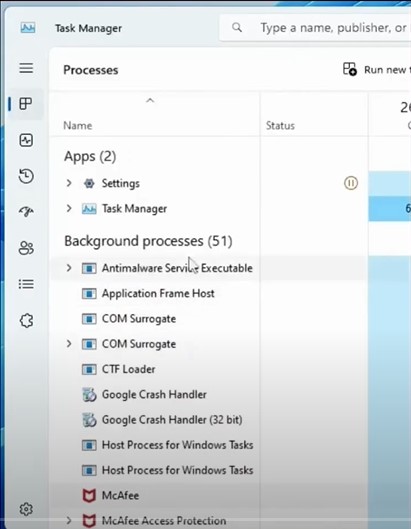
Locate any kind of application and processes


  Step 3: Right-click on the app and click End Task.
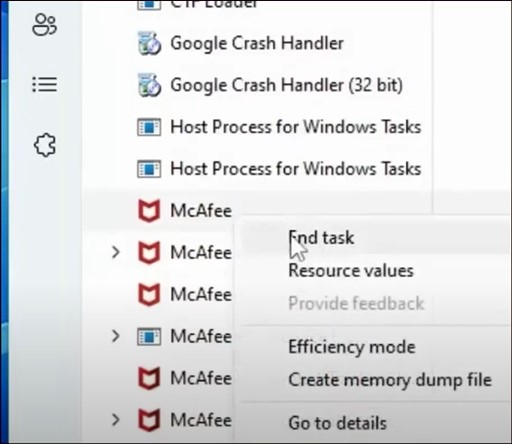
app and click End Task


Step 4: Scroll through the entire list and end the task of the apps you don’t identify.
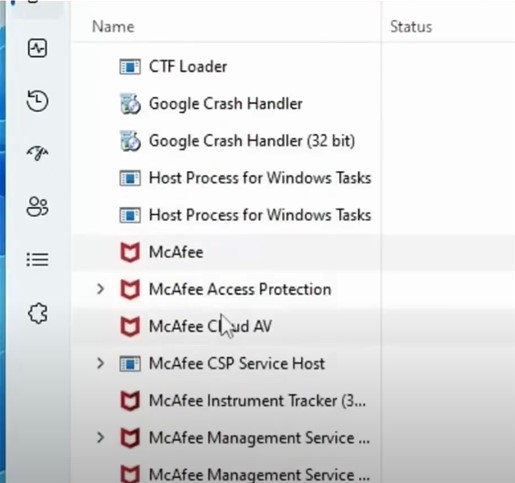
Scroll through the entire


   Step 5: Once done, close the window.

close the window

Method 2: Disable Notifications From Windows

     Step 1: Right-click on the Windows icon and select Settings.
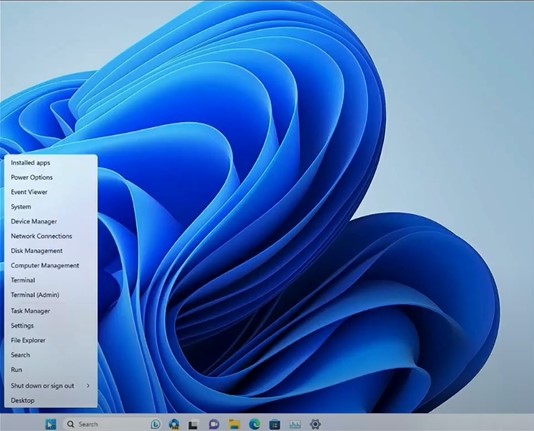
Windows icon and select Settings


  Step 2: Click on System and select Notifications.
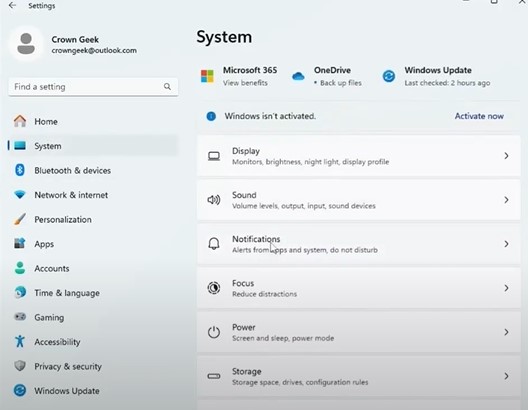
Click on System and select Notifications

Also Read:- How to Get Rid of McAfee Pop-Ups?

   Step 3: Scroll down and turn off notifications of the apps that are causing the issue.
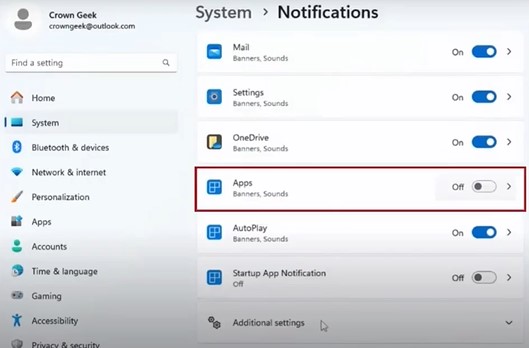
turn off notifications of the apps


   Step 4: Once done, click Additional Settings, then uncheck all the three options.
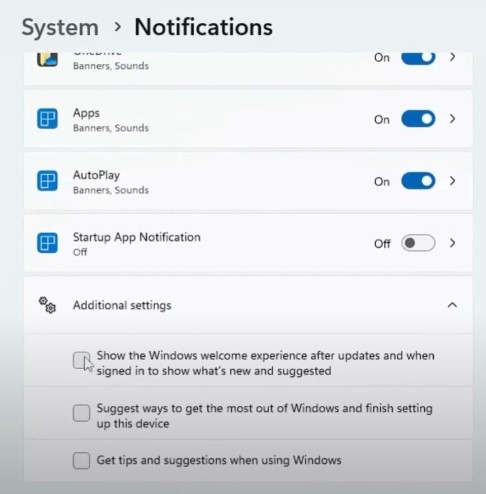
click Additional Settings


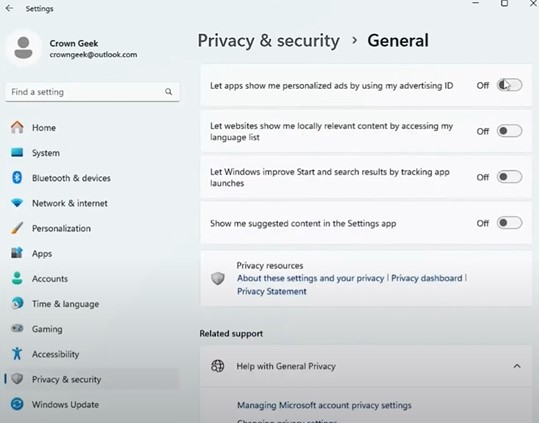
   Step 5: Now, click on Privacy & Security in the left panel.
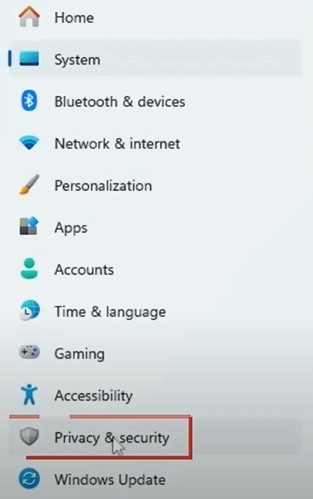
click on Privacy & Security

 
  Step 6: Click on General, disable all four notifications, and close the window.
disable all four notifications
 

Method 3: Disable McAfee Services

   Step 1: Click the Windows search icon, type Services, and open it.
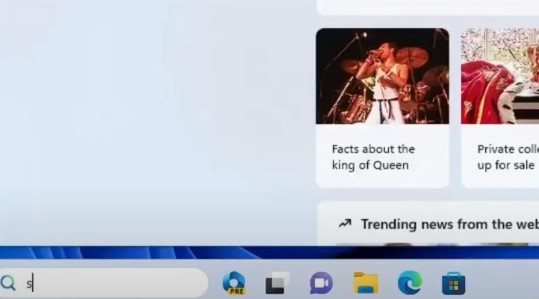
Click the Windows search icon


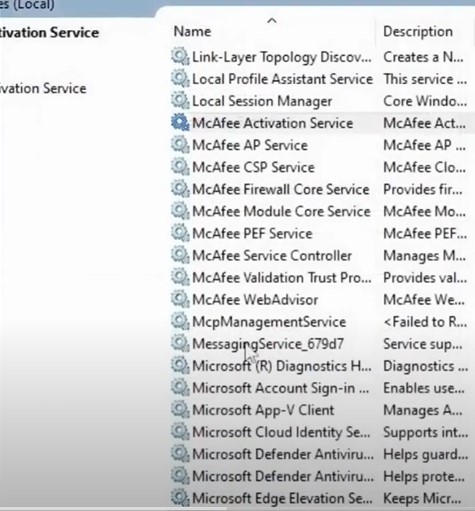
   Step 2: Look for services related to McAfee.
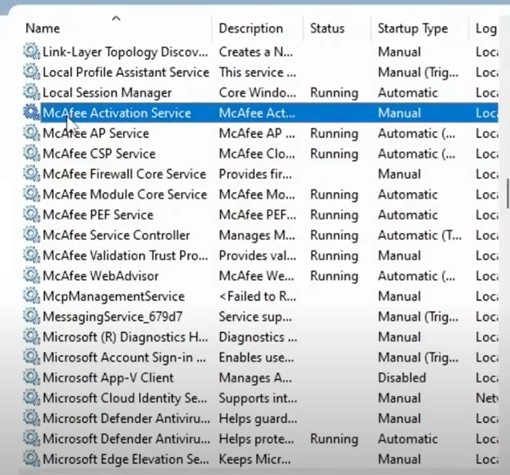
services related to McAfee


   Step 3: Right-click on the service and select Properties.
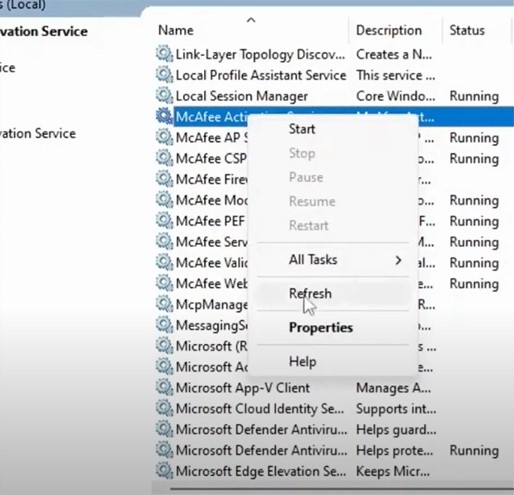
Right-click on the service


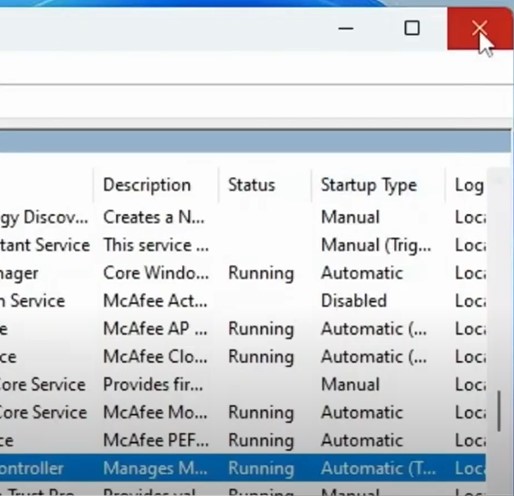
   Step 4: Click on the Startup Type drop-down and select Disabled.
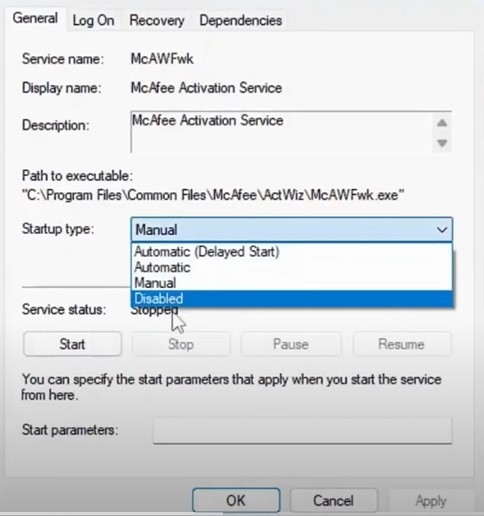
Startup Type drop-down


   Step 5: Then click OK.

Then click OK


   Step 6: Repeat the same steps to disable all the McAfee services.
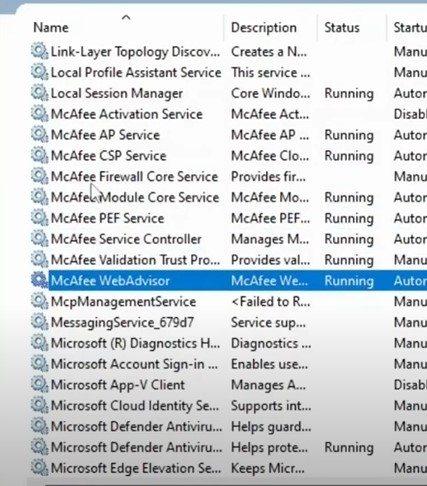
steps to disable all the McAfee services


   Step 7: Once done, close the window

close the window


Method 4: Change Google Chrome Settings

   Step 1: Open Google Chrome and click on the three dots at the top right side of the screen.
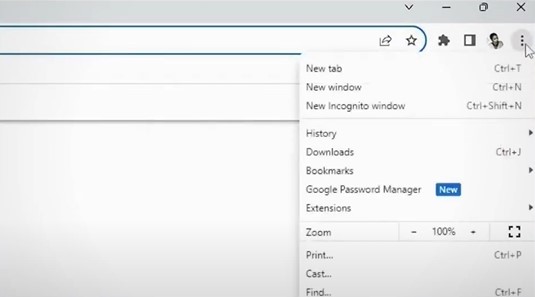
Open Google Chrome

  Live chat with experts

    Step 2: Click on Extensions and select Manage Extensions.
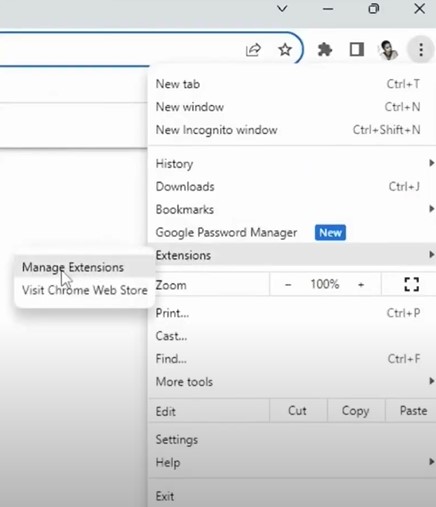
Click on Extensions


    Step 3: If you find any suspicious extensions that you do not identify, disable and remove them.
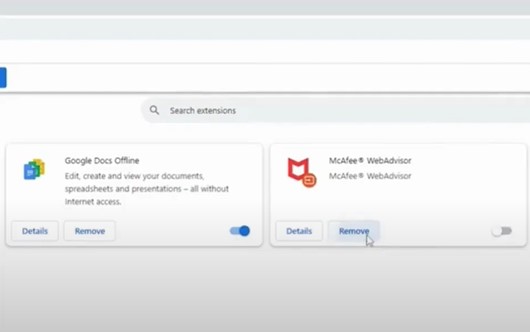
suspicious extensions


   Step 4: Once done, click on the three dots again and select Settings.
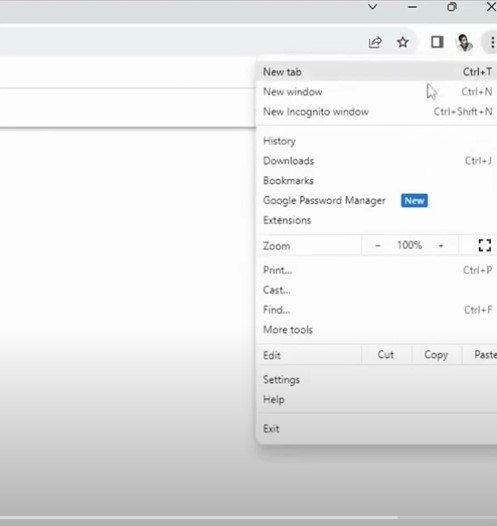
click on the three dots again


   Step 5: Click on Privacy and Security, then click on Settings.
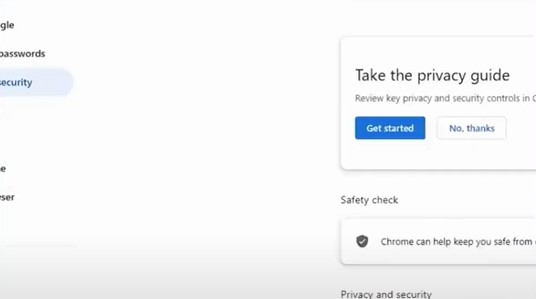
Click on Privacy and Security


   Step 6: Select Notifications and then select Don’t Allow Site to Send Notifications options.
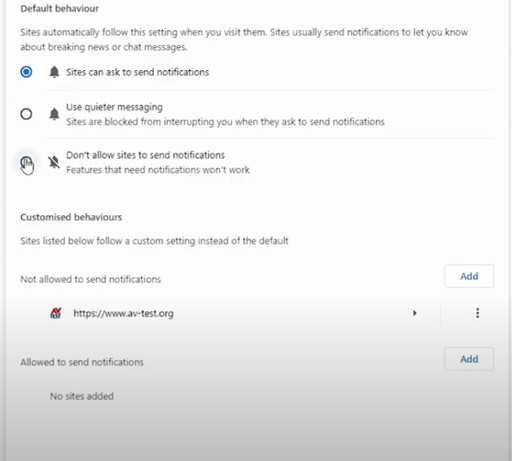
Don’t Allow Site to Send Notifications


   Step 7: Under Customized Behaviors, check if any websites have been added to the allowed list.
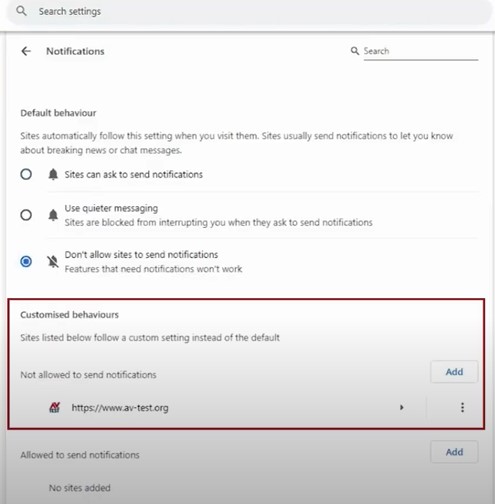
Under Customized Behaviors


   Step 8: If any website has been added, click on the three dots and select Remove.
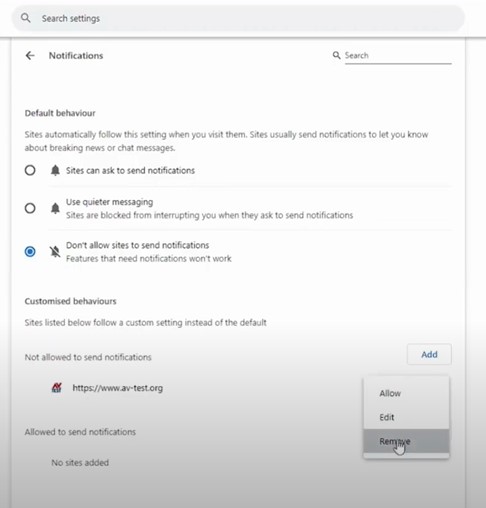
three dots and select Remove


   Step 9: Click on Privacy and Security again on the left side of the panel, then select third-party cookies.
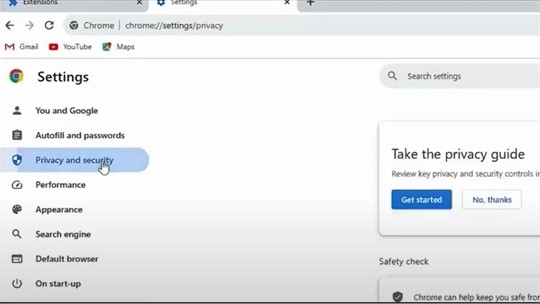
Click on Privacy and Security again


   Step 10: Click on See All Site Data and Permissions, then click on Clear All Data.
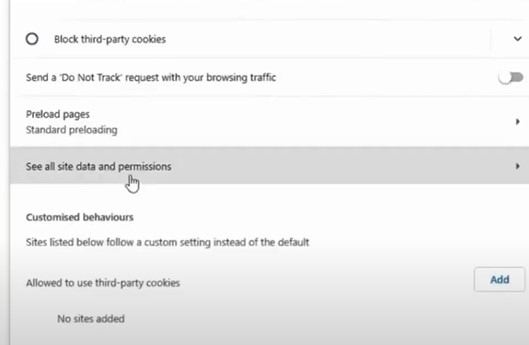
Site Data and Permissions


  Step 11: Click Clear on the pop-up prompt to proceed.
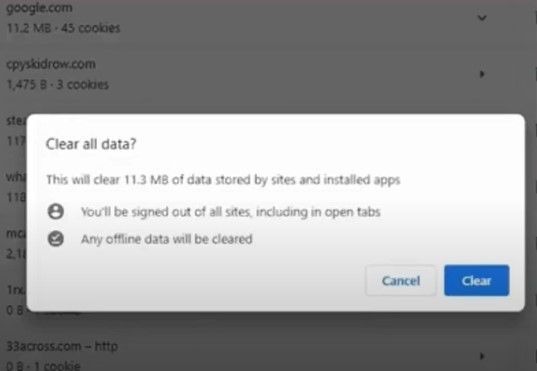
Click Clear on the pop-up prompt


   Step 12: Once done, click on Privacy and Security again and select Clear Browsing Data.
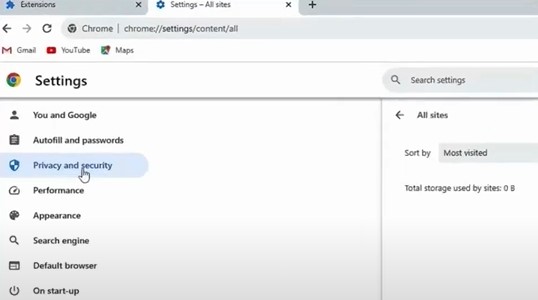
click on Privacy and Security again


  Step 13: Go to the Advanced tab and set the time range to All Time.
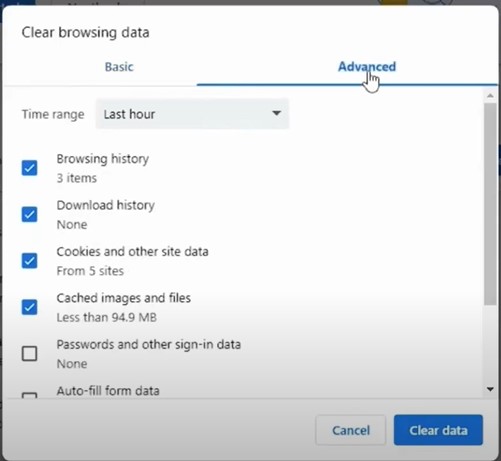
Go to the Advanced tab


  Step 14: Check all the options except for Passwords and other sign-in data and Auto-fill form data, and click Clear Data.
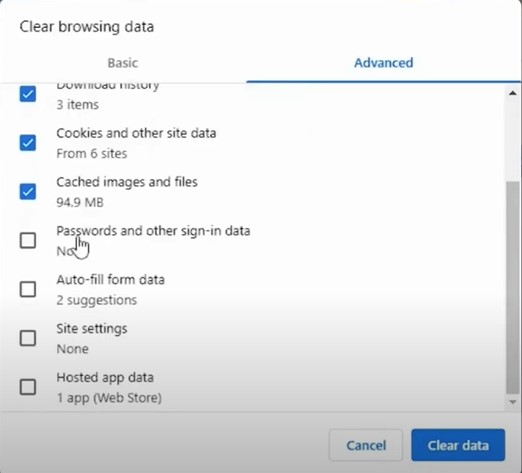
Check all the options except for Passwords


   Step 15: Once done, click Reset Settings on the left side of the window panel.
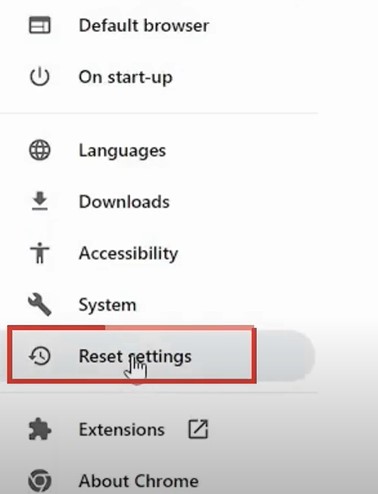
click Reset Settings


  Step 16: Click Restore Settings to their Original Defaults and click Reset Settings.
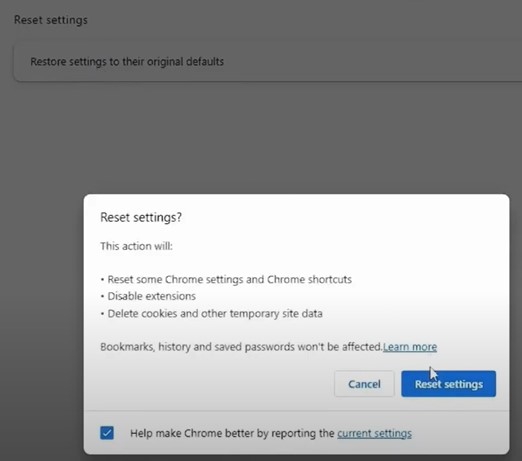
Click Restore Settings to their Original


   Step 17: Close the window

Close the window


Method 5: Change Microsoft Edge Settings

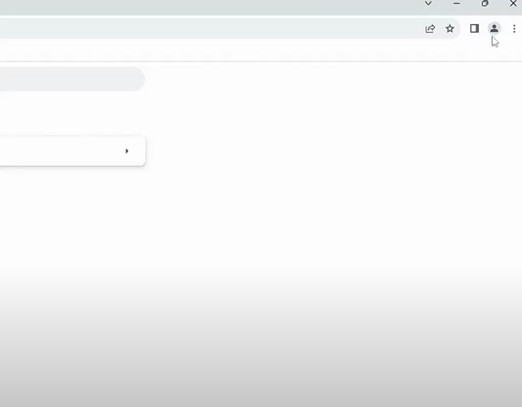
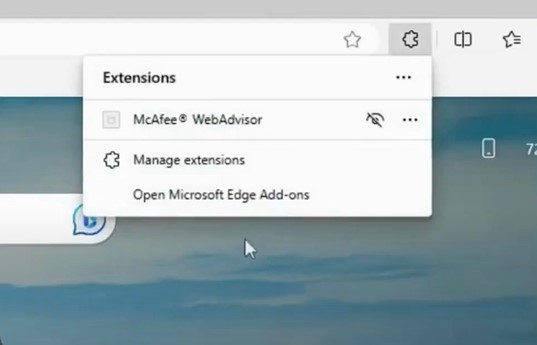
   Step 1: Open Microsoft Edge, click on the three dots at the top right side of the screen and click on Extensions.
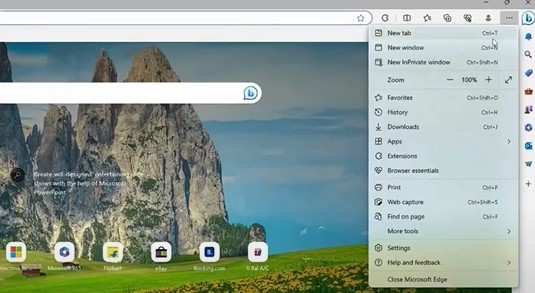
Open Microsoft Edge


   Step 2: Click Manage Extensions, then disable and remove any suspicious apps related to McAfee.
Click Manage Extensions


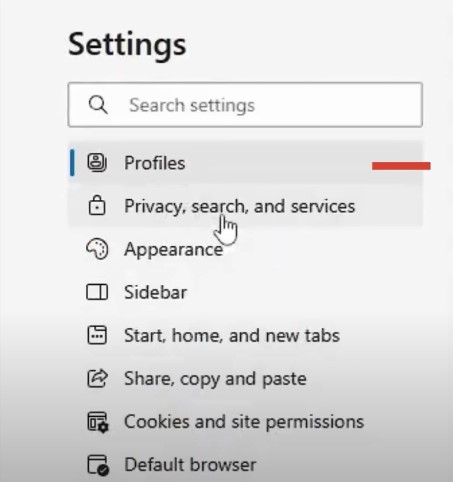
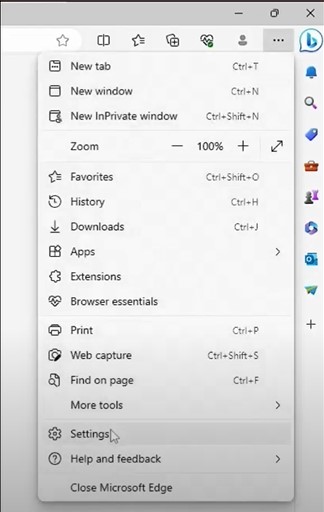
   Step 3: Click on the three dots again and select Settings.
Click Privacy, Search
 
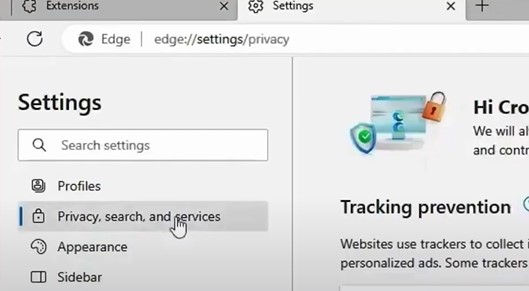
     Step 4: Click Privacy, Search, and Services in the left menu.
Click Privacy, Search
 
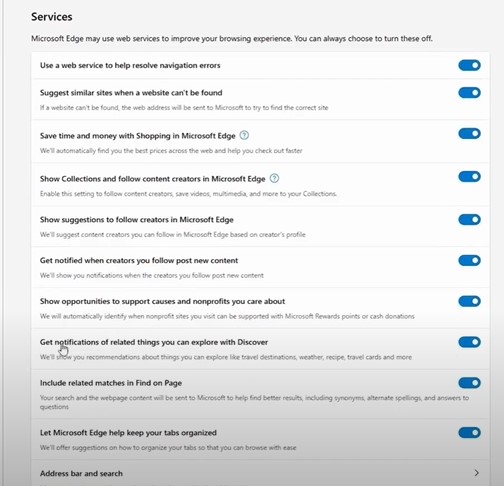
  Step 5: Scroll down to the Services section, then turn off the Get notifications of related things you can explore with the Discover option.
Scroll down to the Services section
 
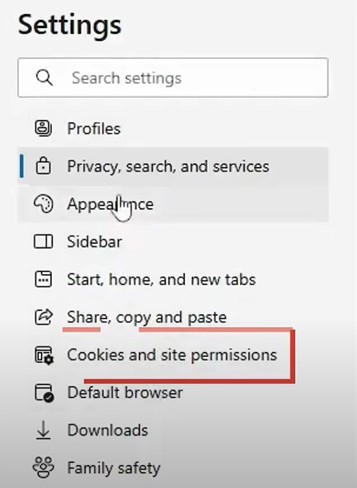
   Step 6: Click on Cookies and Site Permissions in the left menu.
Click on Cookies and Site Permissions
 
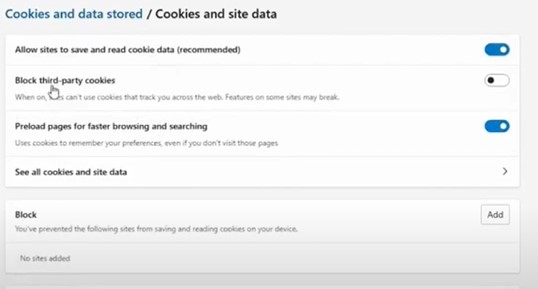
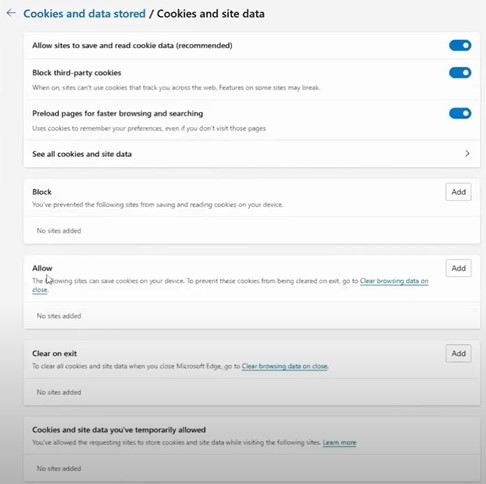
   Step 7: Click on Manage and Delete Cookies and Site Data and enable the Block third-party cookies option.
Click on Manage and Delete Cookies
 
 
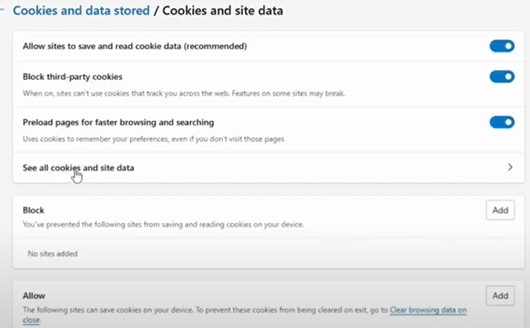
   Step 8: Click on See all Cookies and Site Data, then click on Remove All.
Click on See all Cookies and Site Data
 
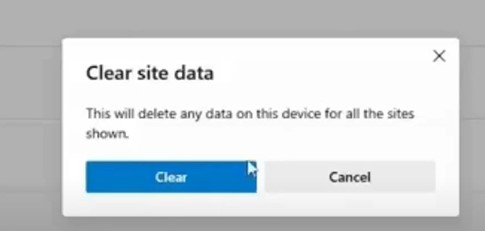
  Step 9: Click Clear on the prompt to proceed.
Click Clear on the prompt to proceed
 
  Step 10: Click on the back arrow button, check the Allow list, and confirm that any sites related to McAfee are not listed.
Click on the back arrow button
 
  Step 11: Click on Privacy, Search, and Services again, and click on Choose What to Clear next to Clear Browsing Data Now.
Click on Privacy, Search, and Services again
 
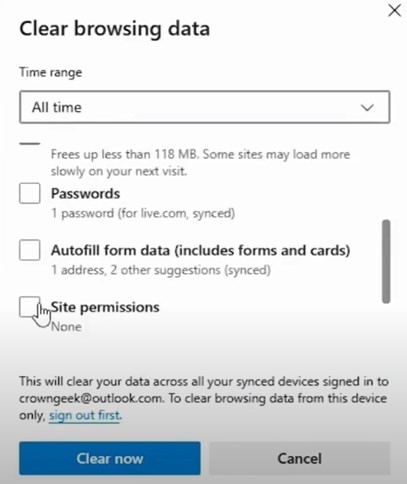
   Step 12: Set the Time range to All Time, check all the options except for Passwords and Autofill from data, and click Clear Now.
 
Set the Time range to All Time
 
   Step 13: Once done, close the window.
close the window


Conclusion 

That’s all in this write-up that emphasizes how you can disable or turn off annoying McAfee notifications and pop-ups. Beware of all the potential problems that may arise during the troubleshooting process.

If you still struggle to resolve the issue even after trying the above methods, give a call to an expert. 

 
Was this article helpful?
Antivirus Support
Tags: Disable/Turn Off Annoying McAfee Notification And Pop-Up
  • Share
Prev
How to Remove/Uninstall Avast Antivirus Windows 11/10?
Next
How to Cancel Kaspersky Auto Renewal?

free consultation

Table of Contents

  • Potential Problems When Disabling Mcafee Pop-Ups
  • Methods to Disable McAfee Notification and Pop-Up
  • Conclusion 

Recent Post

About McAfee Corp

Learn All About McAfee Corp. [A Cybersecurity Company]

Feb 23, 2023
Kaspersky

Things You Need to Learn About Kaspersky Before Choosing It!

Feb 23, 2023
About AVG Technologies

All You Need to Know About AVG Technologies

Feb 23, 2023
Important Facts to Know About Norton

Important Facts to Know About Norton

Mar 27, 2023
Know About the Bitdefender Company

Everything You Need to Know About the Bitdefender

Mar 28, 2023
Antivirus Tales

An independent troubleshooting resource for antivirus software errors. Guides here cover installation failures, update issues, scan errors, product key problems, and more - across all major antivirus programs.

Not affiliated with any antivirus company.

Company

  • Home
  • Knowledge Base
  • Support
  • Contact Us

Issues We Resolve

  • Learn All About McAfee Corp. [A Cybersecurity Company]
  • Things You Need to Learn About Kaspersky Before Choosing It!
  • All You Need to Know About AVG Technologies
  • Important Facts to Know About Norton
  • Everything You Need to Know About the Bitdefender
  • Everything You Should Know About the Sophos

Contact Info

  • Email info@antivirustales.com
  • Contact US +1-857-557-6826
    UK +44-161-791-4591
  • Address 698 NE 1st Ave, Miami FL 33132

Copyright © 2026 by Antivirustales.com All rights reserved.

  • Terms Of Use
  • Disclaimer
  • Privacy Policy
image-not-found
1
2
3
4
5

Step 1

Let's start 😀

Which operating system do you use ?

Step 2

Step 2 to 5

Let us know the device you are facing this error/issue on:

Step 3

step 3 to 5

Let us know, since how long have you been facing this error/issue

Step 4

step 4 to 5

Kindly enter your name and email

Step 5

Last step 🏆

Let us schedule a call for you

Step 5

Completed 100% 🏆

Thankyou for contacting us

Our subject matter expert will contact you on the provided number, kindly answer all the calls.

Chat Support
🍪 We are using Cookies! For more information visit this page  Cookie policy.