
How to Find Scan Exclusions in Norton 360?
The Norton 360 you have been using has done a great job keeping your computer safe, blocking potential threats, and running regular scans. However, over the past few weeks, it has been flagging certain files you know are safe and scanning folders that slow things down.
You may be wondering: Is there a way to exclude certain files and folders from scans? Yes, by accessing the Scan Exclusions settings. Customizing what Norton 360 scans gives you more control over the process, helping you avoid false positives and improve your computer’s performance.

Let’s learn how to find and manage Scan Exclusions in Norton 360. But before we begin, let’s take a quick look at the potential issues that may arise during the process.
Potential Issues When Finding Scan Exclusions in Norton 360
When trying to find Scan Exclusions in Norton 360, you may run into some problems. These can be:
-
False positives
-
Complexity in configuration
-
Performance issues
Mistakes to Avoid When Finding Scan Exclusions in Norton
Finding Scan Exclusions in Norton is quite easy, but some users make certain errors when doing so. If you are doing it for the first time, here are the common mistakes that you need to avoid:
Looking in the Wrong Menu
Norton 360 has multiple settings sections (Firewall, Performance, Device Security, etc.). Some users check the firewall or general settings rather than navigating to the specific scan or antivirus settings.
Ignoring the Search Bar
Some users may overlook the built-in search bar within Norton’s settings to find “Scan Exclusions quickly.” Using this feature can save time and make things easier.
Not Expanding Advanced Options
Scan exclusions are usually tucked under “Advanced” settings. Many users may not realize that they have to expand these options. They might miss the exclusions section entirely.
Using Outdated Software
Older versions of Norton may have a different layout. If you are not using the updated version of the antivirus software, you may have a hard time locating the current exclusions menu.

Mixing Up Real-Time and Scan Exclusions
Norton lets users set exclusions for real-time protection and scheduled scans. But some users might confuse the two, and that can lead to unexpected results.
Easy Steps to Find Scan Exclusions in Norton 360
Follow these straightforward steps to find the Scan Exclusions option in Norton easily:
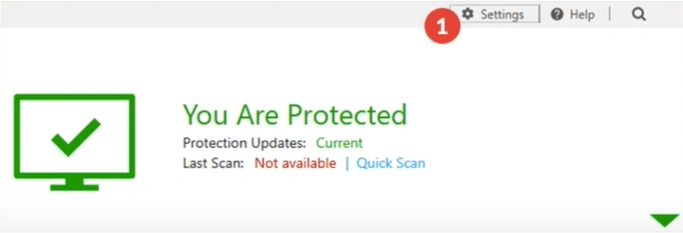
Step 1: Open your Norton antivirus and click on “Settings.”
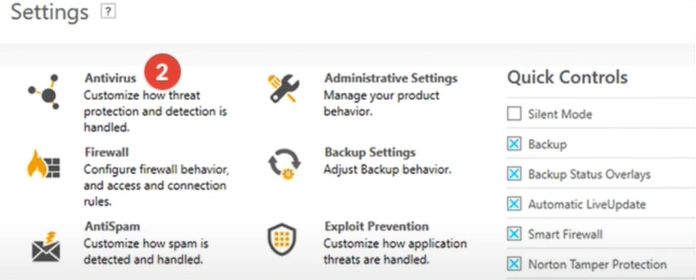
Step 2: Click on Antivirus.
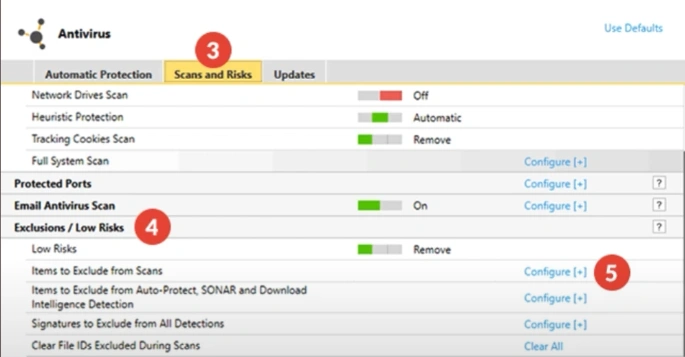
Step 3: Open the “Scans and Risks” tab, then click on “Exclusions/Low Risks.”
Wrap Up
Follow the instructions above to find Scan Exclusions in Norton 360 in just a few clicks. Look into the specific scan or antivirus settings, don’t forget to expand Advanced options, and confirm that you are using an updated Norton version. Address the potential problems that are likely to arise when finding Scan Exclusions.
